Your first domain Step 5 of 30
Publish the DNS records
The two TXT records DMARCLoop needs, where to add them (with steps for Cloudflare, GoDaddy and Microsoft 365), and how to hand the job to IT.
Updated
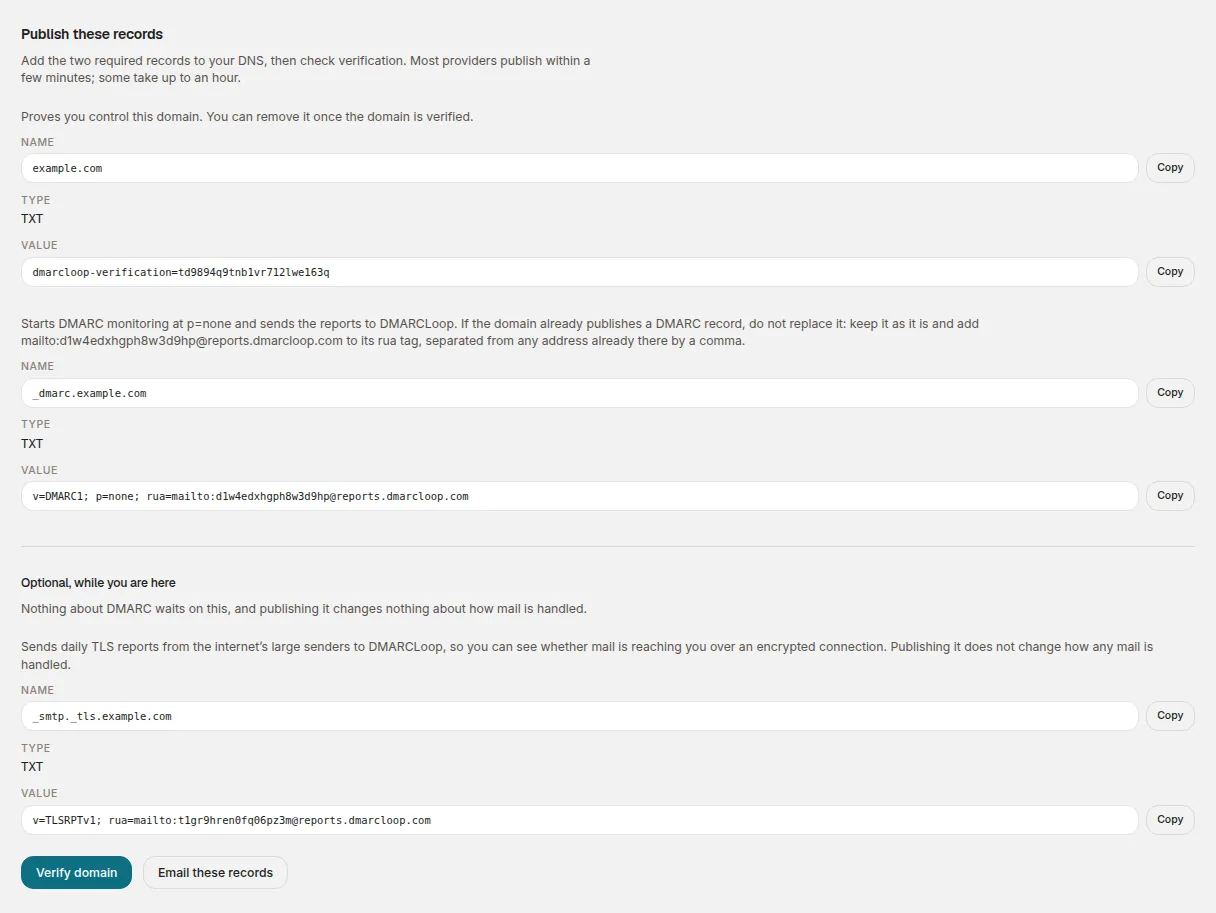
Your domain’s page lists the records under Publish these records. There are two required TXT records, and one optional one. Copy the values from that page — every domain’s values are different — rather than from the examples below.
The records
For example.com, they look like this:
| Name | Type | Value | Needed |
|---|---|---|---|
example.com |
TXT | dmarcloop-verification=… |
Required |
_dmarc.example.com |
TXT | v=DMARC1; p=none; rua=mailto:d1…@ |
Required |
_smtp._tls.example.com |
TXT | v=TLSRPTv1; rua=mailto:t1…@ |
Optional |
The verification record goes on the domain itself (often written @ in
DNS panels). It proves to us that you control the domain. Leave it in place
after verification: DMARCLoop re-checks it, and if it disappears the domain is
treated as unverified again and you are alerted.
The DMARC record goes at _dmarc. It asks mail receivers to send their
daily aggregate reports to your reporting address.
- If you already have a DMARC record, edit it — don’t add a second one. A
domain with two records at
_dmarchas, as far as receivers are concerned, no valid DMARC record at all. The value on your domain page is your current record with our address added torua, so replacing the old value with it keeps your policy and any other report addresses as they were. - If you have none, the value starts at
p=none: reporting only, nothing about delivery changes.
The TLS reporting record is optional and is listed separately on the domain page. It reports on mail arriving at your domain over encrypted connections — a different question from DMARC — and nothing waits on it. Publishing it changes nothing about how mail is handled, so if you are already in your DNS panel it costs nothing to add it now.
Where to add them
Records are added wherever your domain’s DNS is hosted, which isn’t always the company you registered the domain with. A domain bought at one registrar can have its DNS served by Cloudflare, by your web host, or by Microsoft 365. Adding records at the registrar when someone else serves your DNS is the most common way an afternoon gets wasted.
The domain page names your DNS provider when we recognise its nameservers, and links to its DNS panel. If it doesn’t, the free Domain Checker shows your domain’s nameservers, which usually name the company.
Cloudflare
- Sign in at dash.cloudflare.com and open the domain.
- Choose DNS, then Records, then Add record.
- Type is TXT. In Name, enter only the part before the domain:
_dmarcfor the DMARC record,@for the verification record. - Paste the value into Content exactly as shown. Cloudflare adds the quotes for you.
- TXT records are never proxied; leave TTL on Auto.
- Save. Cloudflare publishes within a minute or two.
GoDaddy
- Sign in to GoDaddy, open My Products, and choose DNS next to the domain.
- Under DNS Records choose Add New Record.
- Type is TXT. In Name, enter only
_dmarcfor the DMARC record, or@for the verification record. GoDaddy adds the domain for you. - Paste the value with no surrounding quotes — GoDaddy quotes it itself, and a value pasted with quotes ends up published with two sets.
- Leave TTL at the default and save. GoDaddy usually publishes within an hour, sometimes sooner.
Microsoft 365
If your nameservers end in dns.microsoft, your DNS is managed inside
Microsoft 365.
- Sign in to the Microsoft 365 admin center and choose Settings → Domains, then the domain.
- Open DNS records, choose Add record, then TXT.
- In TXT name enter
_dmarcfor the DMARC record, or@for the verification record. - Paste the value into TXT value and save. Microsoft publishes within a few minutes.
Anywhere else
- Sign in wherever your domain’s DNS is managed — usually your registrar or web host.
- Find the DNS records for the domain (sometimes called the zone, DNS management or advanced DNS).
- Add a TXT record for each row. If the panel adds the domain to the name for
you, enter only the part before it (
_dmarc); if it wants the full name, enter it as shown. - Paste each value exactly. If the panel asks about quotes, let it add them rather than typing them yourself.
- Leave TTL at its default and save.
Mistakes that are easy to make
- A doubled name. Typing
_dmarc.example.cominto a panel that appends the domain publishes_dmarc.example.com.example.com. Enter_dmarcalone. - Two DMARC records. Edit the existing one instead (see above).
- Extra quotes, or a value cut short when pasted. Compare what you published with the domain page character for character.
When someone else looks after your DNS
That’s common, and you don’t need to give them an account. On the domain page, Email these records sends the records — with the steps for your DNS provider and a paragraph explaining what they do — to the people on your account who receive this domain’s emails, ready to forward. (The same email went out automatically when you added the domain.)
The email also contains a link to a read-only records page. Whoever adds the records can open it without signing in, see exactly what to publish, and use its Check now button to confirm the records took. It shows nothing else about your account, and the link expires after 30 days.
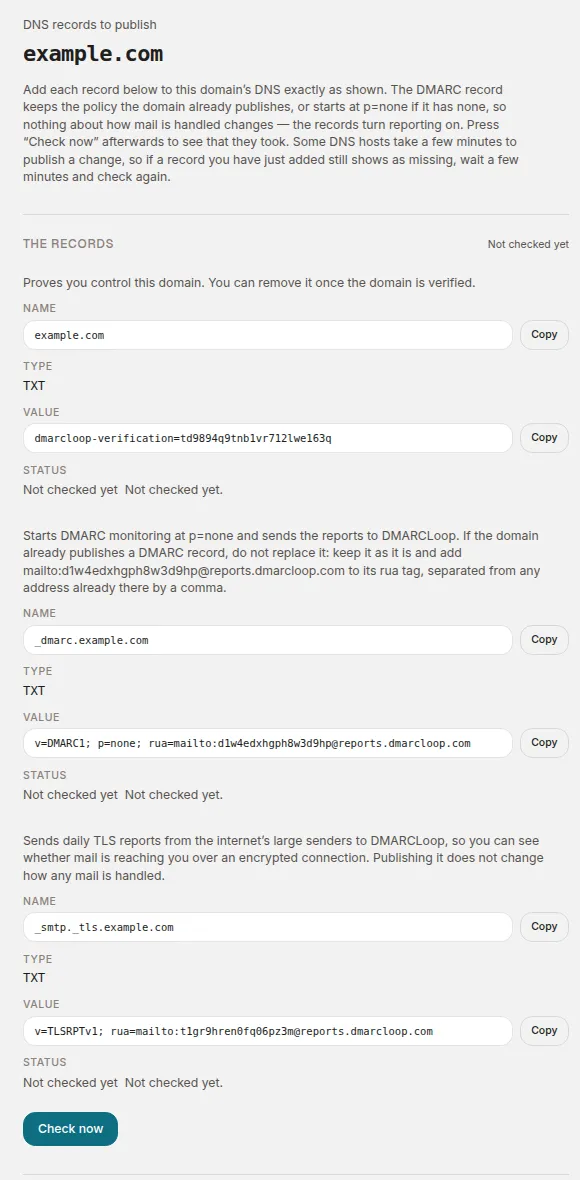
If you need it said in one sentence for an IT team: the records prove ownership and turn DMARC reporting on; they keep any policy the domain already publishes, or start at p=none, so nothing about how mail is handled changes.
Next
Stuck? Reply to any email DMARCLoop sends, or contact us — a person reads it.